
Old Fashioned Buttermilk Donuts
(12 servings)
- 3 cups all-purpose flour
-
1 cup sugar
-
3/4 cup buttermilk
-
2 large eggs
-
1 egg yolk
-
2 Tablespoons shortening - softened
-
1 Tablespoon butter - softened
-
2 teaspoons baking powder
-
1/2 teaspoon baking soda
-
1 teaspoon salt
-
1 and 1/2 teaspoon ground nutmeg
-
1/2 teaspoon cinnamon
-
canola oil - for frying
This recipe makes a dozen donuts and a dozen holes, or 14 or 15 donuts if you collect the holes to make more donuts.
Place half of the flour in the bowl of a standard mixer fitted with a paddle attachment. Add all remaining ingredients (except for canola oil and remaining flour).
Mix on low for 30 to 40 seconds. Scrape down the sides of the bowl with a rubber spatula. Mix 1 minute at medium speed.
Set mixer back to low speed and gradually add remaining flour. Once incorporated, scrape down the sides. Mix on medium speed for 1 and 1/2 minutes.
Wrap dough in plastic wrap and refrigerate for at least 90 minutes or up to 2 days.
When ready to fry the donuts...
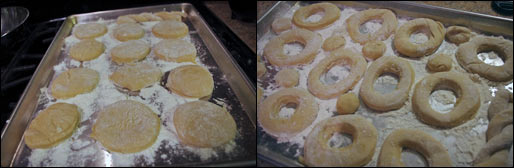
Turn dough out onto a generously floured surface. Sprinkle flour generously over the top of the dough and pat it down to a 1/2-inch thickness. Using a 2 1/2-inch or a 3-inch biscuit cutter, cut out as many donuts as possible.
Transfer the rounds to a floured baking sheet. Cut holes into each donut using a 1-inch cutter or the rim of a shot glass.
Gather the dough remnants (including the holes if you don't intend to make donut holes) and repeat the flattening and cutting process until you've exhausted all of the dough.
Heat oil to 360 degrees. The oil should be about 3 inches deep.
Fry in batches, never overloading the fryer and always letting the temperature rise back to 360 degrees between each batch.
Carefully - using a metal spatula - transfer and slide individual donuts into the hot oil. As soon as they float, flip them over (chop sticks actually work great for this). Cook the undersides for 60 seconds. Flip the donuts again and cook for 30 second or until lightly golden brown on the bottom.
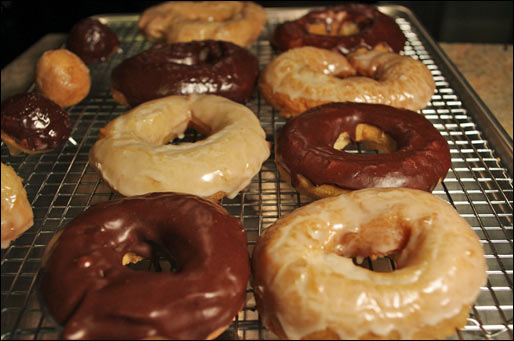
Transfer finished donuts to stacked paper towels. If glazing the donuts, use the directions below. The donuts should still be warm (not hot) when you apply the glaze.
Sugar Vanilla Glaze
This glaze is almost clear in appearance and gives the donuts a white-tinted sheen as opposed to a frosted appearance.
- 1 and 1/2 cup powder sugar
- 5 Tablespoons milk
- 2 teaspoons vanilla
In a shallow bowl with a bottom at least 3 and 1/2 inches in diameter, combine all three ingredients. Mix with a small whisk or a fork until smooth and creamy. Dip the top and sides of each warm donut into the glaze. Return donuts to stacked paper towels and give them a couple minutes for the glaze to firm up.
Chocolate Glaze
This glaze appears more like a frosting. You may wish to double-dip your donuts into the glaze depending on how much topping you desire.
- 1 and 1/2 cup powder sugar
- 4 Tablespoons cocoa powder
- 6 Tablespoons milk
- 2 teaspoons vanilla
In a shallow bowl with a bottom at least 3 and 1/2 inches in diameter, mix together the powdered sugar and cocoa powder. Add the milk and vanilla and stir until soft, creamy and free of lumps. Dip the top of each warm donut into the glaze. Return donuts to stacked paper towels and give them a couple minutes for the glaze to firm up.
Recipe Realities:
Old fashioned donuts are the hardest donuts to work with at home. Unlike regular cake donuts or yeast donuts, the dough is very sticky and soft. You might feel discouraged as your donuts bend out of a perfectly circular shape as you cut them and transfer them. Donut shops have the luxury of having the dough extruded into the oil without having to touch human hands. In the home kitchen, it takes a gentle, confident touch and some patience to make old fashioned donuts. But don't worry. As the finished donuts emerge from the hot oil, even the most misshapen donut has a tendency to regain it's circular shape. And lets face it - a tasty old fashioned donut could be shaped like a rock and still be delicious.
Here's some tips to help get the best out of this recipe:
- Use a lot of flour to dust your work surface. Most traditional donut cutters won't work for this dough as it tends to stick and get caught within the cutter. A biscuit cutter works better. When cutting out the donuts, stab into the dough and vibrate the cutter from side to side to loosen each donut from the mass of dough.
- It's important not to overcook the donuts. If they get too brown, the flavor becomes too biscuit-like. Stick with the times in the instructions and you'll be alright. You're looking for a very light brown color in the finished donuts. They always seem less browned in the oil than they do after they've set out for a minute.
- If you've opted to make donut holes, fry them at 360 until golden brown. You'll be placing small disks of dough into the oil, but they will emerge as balls. Some of the holes will flip themselves over in the oil. Others need a gently nudge to flip. The cooking time is about 90 seconds per batch of donut holes.
- For the glazes, it may take a minute or two of slow, steady mixing before the mixture became smooth and viscous. After a few seconds, you might be inclined to add more liquid. Resist that idea. Just a few more seconds of mixing and you'll see that the glaze consistency starts to develop with the amount of liquid listed.
Note: We define an Old-Fashioned Donut as a cake donut with a rougher, more textured finish. Instead of being a picture perfect smooth circle, the old fashioned donut has a little more character. Due to a softer dough, the hot oil tends to get into crevices and plays a hand in shaping the final product.
A kitchen-tested recipe to make a donut shop favorite in your home.
Mr Breakfast would like to thank Mr Breakfast for this recipe.
Recipe number 3084. Submitted 1/12/2012.
|
|